Miscellaneous Scripts
- Change Network Connection from Public to Private
- Robocopy with SMTP Status
- Automatically share out Hidden User Profiles from File Server
- Automatically Granting NTFS Permissions Based on Folder Names in Active Directory
- S2D Cluster - Server Manager Data Retrieval Failures Occurred
Change Network Connection from Public to Private
If you’ve ever connected your Windows PC to a network and found that it’s marked as Public when you really wanted it to be Private, you’re not alone.
Windows labels networks as Public by default for security reasons. A Public network assumes you’re on an open Wi-Fi (like a coffee shop or airport) and locks down sharing and visibility. A Private network, on the other hand, is for trusted places like your home or office—it allows features like file sharing, network discovery, and printer access.
Changing this setting through the Windows interface can take a few clicks. But if you’re comfortable with PowerShell, there’s a super-quick way to do it.
You can use the below command to check what Network Category you currently have.
Get-NetConnectionProfile
To change Public to Private, Open PowerShell as an administrator and run:
Get-NetConnectionProfile | Set-NetConnectionProfile -NetworkCategory Private
Running the below command again will confirm if this has worked
Get-NetConnectionProfile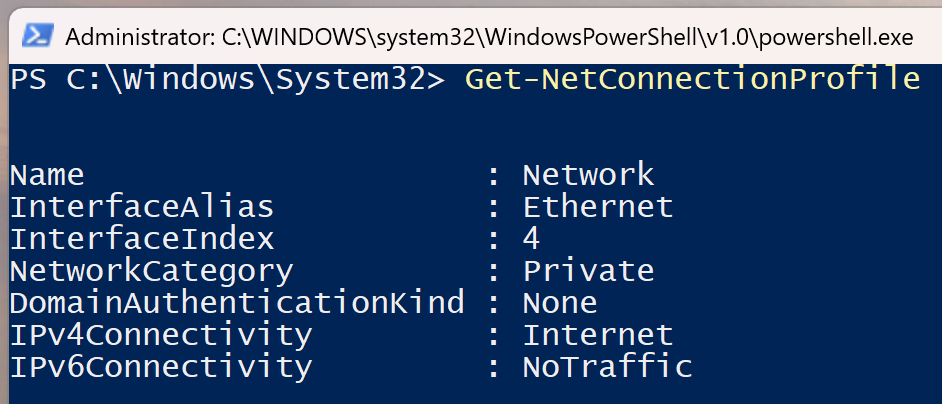
And that’s it! Instead of hunting through settings, you can flip your network from Public to Private in a couple of seconds.
Robocopy with SMTP Status
Robocopy has been around forever, and if you’ve ever had to copy a bunch of files on Windows you’ve probably used it. It’s tough, reliable, and way more powerful than just dragging and dropping in Explorer. But one thing it doesn’t do out of the box is let you know when it’s finished — which is annoying if you’re running long jobs or setting it up as part of a backup. That’s where this little PowerShell script comes in. It not only runs Robocopy for you, but also shoots off an email when it’s done, letting you know whether everything worked or if something went wrong.
The script starts by defining the basics: where your files are coming from, where they’re going, and where the log file should be saved. Then it sets up the email details — things like the SMTP server, port, username, password, and the from/to addresses for the notification emails. Once that’s ready, it kicks off Robocopy with a bunch of useful switches. /E makes sure all subfolders (even empty ones) get copied, /COPYALL preserves everything about the files including permissions and timestamps, /R:0 and /W:0 mean it won’t keep retrying endlessly if something fails, and /LOG+: appends the output into your log file so you’ve always got a record.
When Robocopy finishes, the script grabs the exit code. Robocopy uses special numbers to tell you what happened — zero means nothing needed copying, one or two usually mean files were copied or extra files were found, and those are all considered “success” cases. Anything above three usually signals an error. With that in mind, the script checks the code and, if it’s three or below, it sends a “success” email with the details and a link to the log file. If it’s higher than that, it sends a “failure” email instead. Either way, you get a notification in your inbox telling you how the job went.
The best part is that you can drop this script into Task Scheduler and let it run whenever you want — overnight backups, weekly sync jobs, whatever works for your setup. Instead of manually checking logs or sitting around waiting for Robocopy to finish, you’ll just get an email saying “all good” or “something broke.” It’s a simple trick, but it makes Robocopy way more practical for real-world use, especially if you’re looking after servers or backups and don’t want to babysit them.
$Source = "C:\Source"
$Dest   = "D:\Dest"
$Log    = "C:\robocopy.log"


$SmtpServer = "SmtpServer"
$SmtpPort   = 465
$Username   = "Username"
$Password   = "Password"
$From = "robocopy@example.com"
$To   = "alerts@example.com"


Write-Host "Starting Robocopy from $Source to $Dest ..."
& robocopy $Source $Dest /E /COPYALL /R:0 /W:0 /ETA /V /LOG+:$Log
$ExitCode = $LASTEXITCODE


$SecurePassword = ConvertTo-SecureString $Password -AsPlainText -Force
$Cred = New-Object System.Management.Automation.PSCredential($Username, $SecurePassword)


if ($ExitCode -le 3) {
    Send-MailMessage -From $From -To $To -Subject "Robocopy Completed" -Body "Robocopy finished successfully. Exit code: $ExitCode. See log at $Log" -SmtpServer $SmtpServer -Port $SmtpPort -UseSsl -Credential $Cred
    Write-Host " Robocopy completed successfully. Email sent."
} else {
    Send-MailMessage -From $From -To $To -Subject "Robocopy Failed" -Body "Robocopy failed. Exit code: $ExitCode. See log at $Log" -SmtpServer $SmtpServer -Port $SmtpPort -UseSsl -Credential $Cred
    Write-Host " Robocopy failed. Email sent."
}
Automatically share out Hidden User Profiles from File Server
If you’ve ever had to set up home drives for a bunch of users, you’ll know it’s one of those jobs that gets old really fast. Going into each folder, creating a share, setting the permissions, and making sure it’s hidden — it’s fine for one or two people, but if you’re dealing with an entire company it’s a real time sink. Luckily, PowerShell makes this whole process way easier.
The script we’re looking at takes the folder where all the home drives live — say H:\HomeDrives — and loops through every single subfolder inside it. Each subfolder is assumed to be named after a username, so if you’ve got a folder called jdoe, the script knows that belongs to the user jdoe. It then automatically creates a hidden share for that folder by adding a dollar sign to the end of the name, so instead of \\Server\jdoe you’ll get \\Server\jdoe$. The dollar sign is just a Windows trick to keep the share hidden from casual browsing, but users can still connect to it directly.
Before making the share, the script checks whether one already exists for that username. If it finds one, it deletes it first so you don’t end up with errors. Once it’s clear, it goes ahead and creates the new share, pointing it at the correct folder and giving the matching domain account full access. In other words, the user jdoe will have a hidden share pointing to their own folder, and they’ll be the only one with permissions to it at the share level.
The beauty of this is that it runs through every folder automatically, so instead of spending ages setting up shares by hand, you can run the script once and all your users are taken care of. It keeps the naming consistent, it makes sure permissions are applied properly, and it massively cuts down the admin work. Pair this with the right NTFS permissions on the folders themselves and you’ve got a clean, secure, and automated way to manage home drives without the usual hassle.
 # Path where the home profile folders are stored
$HomeRoot = "H:\HomeDrives"

# Your domain name (edit this to match your environment)
$Domain = "NetBIOS Domain Name"

# Loop through each folder
Get-ChildItem -Path $HomeRoot -Directory | ForEach-Object {
    $UserName = $_.Name
    $FolderPath = $_.FullName
    $ShareName = "$UserName$"   # Hidden share with $ at the end
    $Account   = "$Domain\$UserName"

    Write-Host "Creating share for $UserName -> $ShareName"

    # Remove existing share if it exists
    if (Get-SmbShare -Name $ShareName -ErrorAction SilentlyContinue) {
        Remove-SmbShare -Name $ShareName -Force
    }

    # Create the hidden share (give user full access)
    New-SmbShare -Name $ShareName -Path $FolderPath -FullAccess $Account
}
Automatically Granting NTFS Permissions Based on Folder Names in Active Directory
Managing folder permissions in a Windows environment can be a tedious task, especially when you have a large number of users and corresponding directories. Imagine a scenario where every user has their own folder, and you want to automatically give them the right NTFS permissions without manually clicking through every folder’s properties. That’s where PowerShell shines.
With a simple script, you can loop through a set of folders, match each folder name to an Active Directory (AD) username, and automatically grant the appropriate permissions. The beauty of this approach is that it scales effortlessly, reduces human error, and keeps your file system secure and organized.
Here’s an example script that does exactly that:
# Define the path where the folders are
$FolderPath = "C:\SharedFolders"

# Define the permission to grant
$Permission = "Modify"

# Loop through each folder
Get-ChildItem -Path $FolderPath -Directory | ForEach-Object {
    $FolderName = $_.Name
    $FolderFullPath = $_.FullName

    # Check if a user with that username exists in Active Directory
    $ADUser = Get-ADUser -Filter { SamAccountName -eq $FolderName }

    if ($ADUser) {
        Write-Host "Granting $Permission permission to $FolderName on $FolderFullPath"

        # Grant NTFS permissions
        $acl = Get-Acl $FolderFullPath
        $accessRule = New-Object System.Security.AccessControl.FileSystemAccessRule(
            $ADUser.SamAccountName,
            $Permission,
            "ContainerInherit,ObjectInherit",
            "None",
            "Allow"
        )
        $acl.SetAccessRule($accessRule)
        Set-Acl -Path $FolderFullPath -AclObject $acl
    } else {
        Write-Warning "No AD user found matching folder name: $FolderName"
    }
}
S2D Cluster - Server Manager Data Retrieval Failures Occurred
If you’ve worked with Storage Spaces Direct (S2D) clusters, you might have run into a frustrating issue in Server Manager:
Online – Data retrieval failures occurred
This message usually shows up under Manageability for cluster nodes. It doesn’t necessarily mean your cluster is broken, but it does make monitoring painful.
Why does this happen?
Server Manager uses WinRM (Windows Remote Management) to pull data from cluster nodes. By default, WinRM has a limit on the size of messages it can handle. In an S2D cluster with lots of performance counters and data, that limit can get exceeded — leading to retrieval failures.
The Fix
Luckily, the solution is straightforward. You just need to increase the WinRM envelope size on your nodes. Run the following PowerShell command:
Set-WSManInstance -ResourceURI winrm/config -ValueSet @{MaxEnvelopeSizekb = “700”}